
With HTTP Basic Authentication, you should use your Sendle ID as the username, and your API Key as the password.
Remember to keep your API key private and treat it like a password, as anyone who has it can manage orders with your Sendle account.
Generate Your API Key
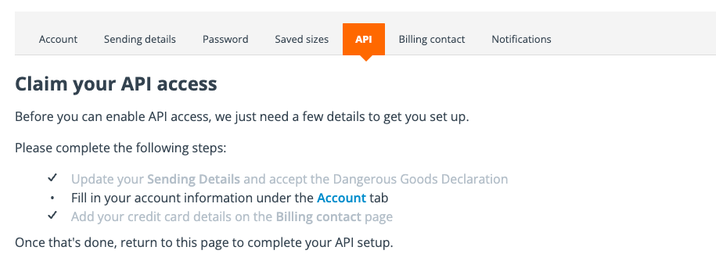
Before you generate your API key, you must first:
- Update your Sending Details and accept Dangerous Goods Declaration (Production / Sandbox).
- Fill in your account information. (Production / Sandbox)
- Add your credit card details. (Production / Sandbox)
- In Production, if you're using offline / manual billing, you'll still need to have a credit card added to your account to complete setup. After sending your Sendle account details to our team, we'll enable manual billing which will stop the credit card from being charged.
- In Sandbox, you'll need to use one of Stripe's test cards instead of a real credit card number.
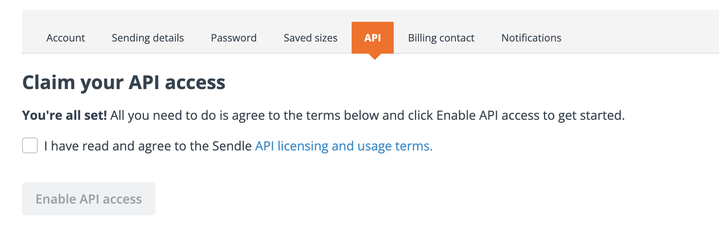
To generate your API key, go to 'Settings' > 'API' tab (Production / Sandbox) and agree to the Sendle API licensing and usage terms. Click 'Enable API access' to view your API key and Sendle ID.
If you are prompted to do so, complete any required steps first before generating the API key.
Confirm Setup
Use the ping endpoint to confirm your Sendle ID and API Key is ready to use.
Regenerate and Rotate your API key
If at any time, you need to rotate your API key, simply navigate back to ‘Settings’ > ‘API’ tab, and click ‘Regenerate API Key’. Any integrations that are set up with the old key will stop working - and you’ll need to update these to use the new key instead.